
Featured Document
-
-
Carefully unpack your RepBox and verify you have all the parts you ordered.
-
See the Parts Key Documents and BOM attached to the bottom of this page for a complete accounting of all parts.
-
-
-
If you opted to print your own 3D parts you can find all the STLs you'll need and instructions on printing here.
-
If you purchased 3D printed parts to be included with your kit you may have received a different color parts than what's shown here. This is normal as we have many color scheme variants. Unless you ordered a specific edition we are not currently able to take specific color requests.
-
Take the time to inspect your 3D Printed parts now and clean out any strings/debris that may have been left over from the printing process.
-
The goal is to be able to press an M3x16mm screw through any of the 3mm holes in the printed parts WITHOUT having to thread them. If its a little snug you can gently file out the hole using the threads of an M3 screw.
-
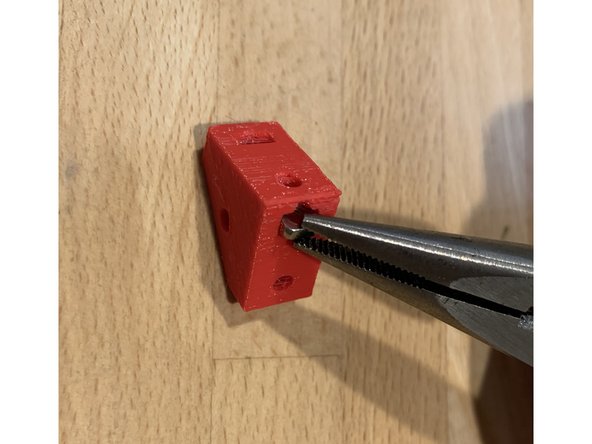
Test any square nut traps for fitment now. Ideally you should be able to press the square nut in by hand and not have it fall back out on its own but your results may vary depending on printer calibration. Needle nose pliers can assist with pressing them in if need be.
-
Any time you spend now making sure everything is clean and fits will save you time and potential frustration later in the build.
-
3D Printed Part color requests can be made at the time of purchase but is not guaranteed as availability is subject to change.
-
-
-
Some of the panels may be "tabbed" or "pinned" together to allow for better protection and packaging preparation. THIS IS NORMAL
-
To separate panels simply break apart at the panel edge seams.
-
Some times a small remnant of material is left where the pinning breaks are on the panels. These can very easily be removed with a hobby knife or flush cutters.
-
FOR MDF VERSION: If you are concerned by the aesthetic of the small "pinning" tabs that you have trimmed you may very easily darken their edge to match the finished cut char with a black felt marker.
-
Its a good idea to take the time and inspect the panels now to make sure all hole cuts and waste pieces from fabrication are removed and cleaned up. Doing so will get you tighter seams where panel joints come together.
-
-
-
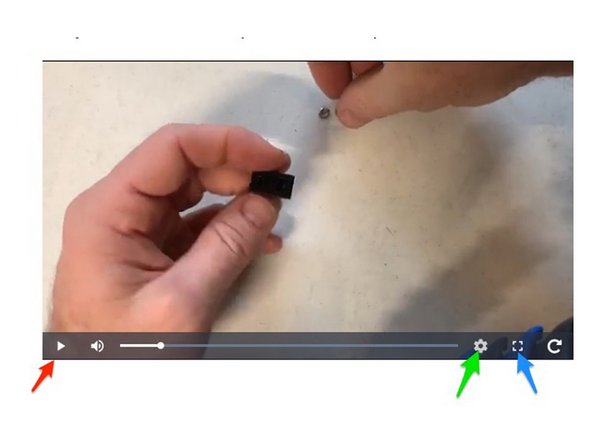
The majority of this guide has been broken into a series of short video clips to provide as much clarity to the assembly process as possible. When using the video player take note of the following:
-
Use the gear icon to select the best resolution available for sharpest detail.
-
Use the enlarge button at the bottom right corner of the video player to zoom in on details.
-
Use the pause key as needed to slow things down and verify positioning, alignment, part selection, etc.
-
PLEASE NOTE: Dozuki limits the length of clips to 30 seconds apiece. We have done our best to pace everything out in meaningful segments but please feel free to comment if you need further clarification beyond the video and accompanying captions.
-
PLEASE TAKE YOUR TIME, WATCH THE VIDEOS IN FULL SCREEN AT HIGH RESOLUTION AND PAUSE THE VIDEO AND REWIND AS NEEDED IF ITS MOVING TOO FAST.
-
We will attempt to supplement videos with photos as much as possible for more clarity and context. Please consider contributing to the guide to help make it clear for others if you feel that more information can be added.
-
-
-
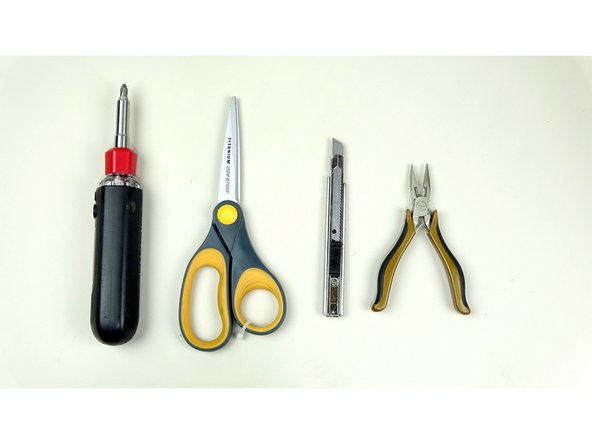
Technically you can assemble your RepBox with nothing but a 2mm allen / hex key, but you'll have an easier time if you also have some of the tools noted above.
-
WARNING: We DO NOT recommend the use of power tools for fastening any part of your RepBox. The included fasteners and integrity of the nut traps are too small to handle the torque load on even light power drivers. Take your time and do it the old fashioned way ;)
-
-
-
Remove any protective films from your acrylic and other panels as needed.
-
Wipe down panels with a damp rag or paper towel and non-ammonia glass cleaner.
-
Verify that all holes are clear of remnant pieces that may not have fallen completely out during the laser cutting process. IF THE PART IS INTENTIONALLY PINNED DO NOT REMOVE IT UNTIL INSTRUCTED TO DO SO. SOME PARTS MAY STAY IN PLACE DEPENDING ON THE VERSION YOU ORDERED.
-
-
-
Bracket Preparation is absolutely critical to a frustration free and successful build. The time you invest now in making sure everything fits well and threads properly will make assembly go so much smoother and prevent possible damage to your brackets or RepBox.
-
Begin by inspecting all your brackets and clear out any potential stringing or blobs left from the 3D printing process.
-
Press square nuts into proper locations for each of the 13 brackets. There are five different nut placement patterns depending on where the bracket is being used in the box:
-
Base: Corners x 4, Centers x 2
-
Top Rear: Corners x 2, Centers x 3
-
Top Front: Corners x 2
-
Below are five quick video clips of how to prep each bracket type, plus a tip at the end for removing nuts if you screw up. Please note how a properly inserted nut will allow you to pass the hex key completely through the nut hole. If you can't do this, check that the nut trap is clear of debris and try to re-seat.
-
-
-
Orient your 3D Printed bracket as shown in this illustration.
-
You'll need three M3 square nuts for each of the four brackets configured this way for each of the four base corners of your RepBox.
-
4 Base Corner Brackets Total
-
-
-
Heres a quick video of the bottom corners being prepared.
-
Be sure to check that your brackets are in all the way by running your hex key through the holes where the screw will eventually go.
-
-
-
Align your 3D Printed bracket as shown here.
-
You'll need two M3 Square Nuts for each of the two brackets configured this way for the brackets at the front and rear center of your RepBox.
-
Two Bottom Center Brackets Total
-
-
-
Heres a video of the two brackets needed being prepared.
-
Make sure to check that the nuts are in all the way by running the hex key through the hole where the screw will later go.
-
-
-
Align your 3D Printed bracket as shown here.
-
You'll need three M3 square nuts for each of the two top rear corner brackets for your RepBox.
-
Two top rear corner brackets total.
-
-
-
Heres a video of the two top rear coner brackets being prepared.
-
Make sure to check that the nuts are pressed in all the way by running your hex key through the hole where the screws will eventually go.
-
-
-
Align your 3D Printed bracket as shown
-
You'll need two M3 Square nuts for each of the 3 brackets taht mount at the top rear center of your RepBox.
-
Three top rear center brackets total.
-
-
-
Here's a video of the three top rear center brackets you'll need being prepared.
-
Test that your nuts are inserted fully by pushing your hex key through the hole where the screws will eventually go.
-
-
-
Align your 3D Printed bracket as shown here.
-
You'll need two M3 square nuts for the two of the top front corners of your RepBox.
-
Two top front corner brackets in total
-
-
-
Heres a video of the two top front corner brackets you'll need being prepared.
-
Be sure to verify that the nuts have been pressed in all the way by running a hex key through the hole where the screws will eventually go.
-
-
-
If you accidentally place a square nut into the wrong slot of the bracket, no biggie, you can easily pop it out using a hex key and the access hole behind each trap point.
-
-
-
There are a few critical steps during assembly that can result in damage or loss of effectiveness if not done properly. These steps will be flagged in bold and with the red warning triangle as pictured here. PLEASE READ CAREFULLY AND GO SLOWLY
-
No steps require any excessive force or strength to complete. If something is not pressing in or fastening as it should, STOP, and re-evaluate. Forcing fasteners into place can lead to cracked panels or other damage. If you do damage anything, replacement parts may be purchased at a discount by contacting support@repkord.com.
-
-
-
Everything all prepped? Good! Time to head over to the main assembly guide!
-
-


Cancel: I did not complete this guide.
6 other people completed this guide.
Attached Documents
