
Introduction
Outlines all the parts you should have received and preparation notes for your build.
Parts
No parts specified.
-
-
Given the increasing number of RepBox versions now available as well as our commitment to continuous improvement and delivering the best possible product you may notice some differences in some of the materials you received in your kit vs. what is shown here.
-
We understand that this can be confusing and we are doing our best to keep up with updating the documentation, images, and videos as new things release but we aren't always able to do so right away.
-
We will continue to add addendums to this guide as appropriate to give you as much context and direction in a timely fashion but if at any point you're unsure of anything please do not hesitate to email us at support@repkord.com for assistance.
-
-
-
Beginning with v2.25 the MDF version of RepBox now uses panels that are coated on both sides for enhanced moisture resistance and reversibility.
-
The laser cutting process on these new MDF panels does tend to produce more dust/particulate at the edges than the MDF panels from previous versions. We do a preliminary wipe during fabrication but it is always a good idea to make sure you're doing a thorough wipe down as noted in the later part preparation steps to keep everything clean.
-
The current photos in this build guide may not reflect the panels you have in your kit depending on when you received it or the version you ordered. Rest assured though the assembly process is the same.
-
For MDF versions of the kit, to allow for the new reversible design you will now have an INNER and OUTER set of side panels. By default the outer panels on the MDF version include cutouts of the Repkord "R"s. Your outer panels may differ if you ordered custom or a branded version of the box.
-
Acrylic versions of the box v2.25 and earlier only include one set of side panels. This is normal.
-
If anything is unclear or you believe you may be missing a part, please contact support@repkord.com and we will be happy to assist.
-
-
-
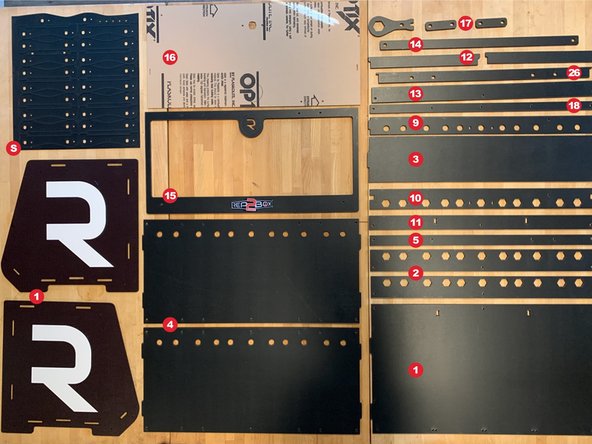
Layout of all the parts you should have. Check the BOM for corresponding part names.
-
The MDF Panel Set is pictured here. If you have the acrylic set it will be cut the same way and the assembly process is the same as well.
-
Newer versions of the box shipping after April 2021 may have a white side on the reverse of the box instead of an unfinished surface as is pictured in this guide. This is perfectly normal and will not affect the build process at all.
-
-
-
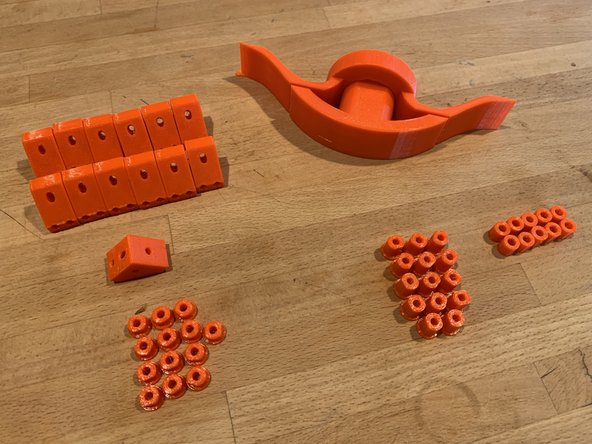
If you ordered the 3D printed parts to be included with your kit you should have the following:
-
13PCS- Brackets
-
13PCS- Flange Nuts
-
1PC- Handle Set
-
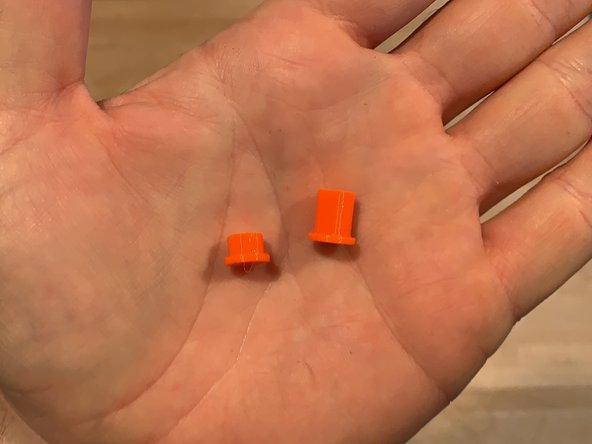
14PCS- Roller Axle (While very similar to the Flange Nut please note the difference in length as shown in second pic.)
-
10PCS- Roller Spacer
-
Your color may vary depending on availability.
-
If you are printing your own the latest parts set can be found at: www.repkord.com/rb2-3d-parts
-
-
-
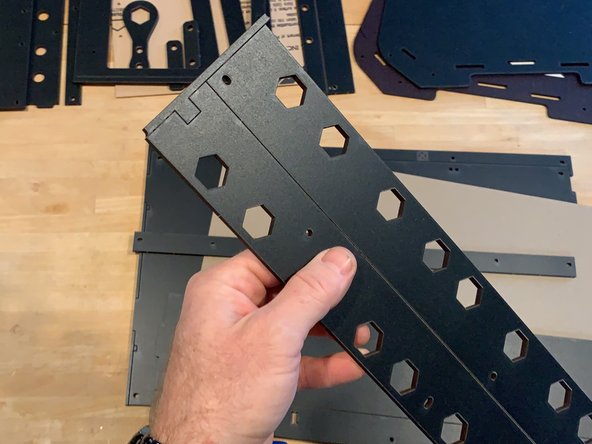
You'll notice that your laser cut panels come tabbed in sheets and zip tied together for maximum protection in shipping. Before getting started remove all the disposable edge tabs at the sides of the panels and separate to easily inventory
-
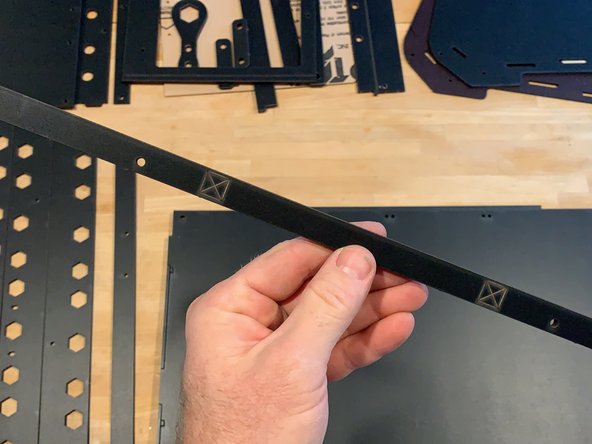
Some of the larger pieces may have "Xs" marked on them to indicate these are waste pieces used for assistance in packaging. If you see the "X" that means its not used in your box build and may be discarded.
-
Sometimes the cuts may not have been completely removed during the cutting process. If you find that to be the case simply poke out any remaining material with a pen or screwdriver tip. This is a perfectly normal part of the fabrication process and does not necessarily indicate an issue with your panel set.
-
-
-
We've done our best to separate videos out into reasonable clip lengths played at a reasonable speed. Take your time and feel free to pause and rewind as needed to get maximum clarity on the build.
-
Should you find a video, imagery or text inadequate, remember this is a wiki and you may feel free to add requests for additional detail or better yet, contribute some yourself if able. It takes a village, consider helping others if you've found something that works for you!
-
We will do our best to monitor this wiki and its comments but please contact support@repkord.com for more immediate response if needed.
-
-
-
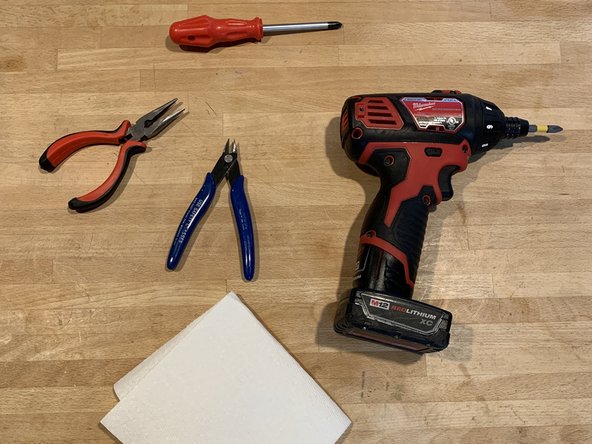
As of version 2.2 a phillips head screw driver is all you should need to assemble your RepBox. However you may find having some of the following optional tools handy also:
-
Gloves and cleaning cloth or rags for any excess particulate from the laser cutting process.
-
Needle-nosed pliers
-
Flush Cutters
-
Powered Phillips Driver: See the note on the following step if you want to use power tools to assemble.
-
A deburring tool
-
SMALL hammer or mallet
-
Solvent, alcohol, or degreaser for excess bearing grease
-
-
-
Power tools are not required and may not really speed up the process that much for you. If you do decide to use a power driver on assembly start by setting your torque to the absolute LOWEST setting to avoid stripping the 3D printed parts or cracking panels.
-
If you break a panel as a result of over-tightening your fasteners. Replacements may be available to you at a discount. Contact support@repkord.com for assistance with this.
-
In an effort to minimize damage during assembly we have done our best to design the 3D printed parts as the failure point in the event of over-torquing since you can always re-print but this is not guaranteed. When in doubt use a manual driver and go slow.
-
-
-
Contents of the kit during unpack.
-
Your kit is customized to your order and may look slightly different depending on the options ordered.
-
-
-
Your parts tube should contain the following items:
-
Parts Pack A: Roller Bearings- 24PCS
-
Parts Pack C: Exit Plugs- 35PCS
-
Parts Pack D: Exit Fittings - 6PCS
-
Parts Pack E: Thread Forming (TF) Screws- 70PCS
-
Part 28: Hinge set of 2 - 1PC
-
Part 29: Steel Lid Prop - 1PC
-
Early kits came in a corrugated wrap as in this video. Later kits include a kraft tube. The contents of each are the same.
-
-
-
Your panel set will be bundled together as follows to maximize protection during shipping.
-
-
-
Remove the shrink wrap and set the sidepanels aside to access the rest of the panel bundle.
-
-
-
Remove zip ties as indicated and inspect the panel sets.
-
Many of the parts are "tabbed" together for protection and organization. Separate out your pieces and arrange them to verify you have everything you need for your build.
-
Many "scrap" pieces have been left on the sides of panels to protect them during shipment. They can easily be separated and discarded as shown.
-
The larger pieces with "Xs" on them are simply for packaging. You may discard them.
-
There may be dust or film on your panels left over from the laser cutting process. This is completely normal. Wipe down all of the panels in your set with a rag or paper towel as you take inventory of everything.
-
-
-
There are a few critical steps during assembly that can result in damage or loss of effectiveness if not done properly. These steps will be flagged in bold and with the red warning triangle as pictured here. PLEASE READ CAREFULLY AND GO SLOWLY
-
No steps require any excessive force or strength to complete. If something is not pressing in or fastening as it should, STOP, and re-evaluate. Forcing fasteners into place can lead to cracked panels or other damage. If you do damage anything, replacement parts may be purchased at a discount by contacting support@repkord.com.
-
-
-
Everything all prepped? Good! Time to head over to the main assembly guide!
-
-


Cancel: I did not complete this guide.
2 other people completed this guide.
