
Introduction
This is a quick overview of the process. Here we are only outlining the cost / benefit tradeoffs of the different installation methods. It's very important that you read these choices and understand which is the best method for you.
THIS IS A WIKI! As such it is a living breathing document. If there are details or images that you feel would better help illustrate how to do something please post them here to help others. Thank you to all those who have contributed!
-
-
OPTIONAL: Print and install the latest parts to upgrade your machine to the latest MK3S+ variant. Since you're already going to need to take apart your hotend to do this upgrade this may be a good time to upgrade the hardware to the latest + revision.
-
OPTIONAL: Upgrade your Prusa MK3/S/+ to its latest firmware.
-
Install the REVO 6 kit using the method of installation that's best for you as outlined below.
-
Re-set your PINDA height and re-do your first layer calibration.
-
Run a PID tune to calibrate your Prusa with the new E3D REVO™ harware.
-
Profit.
-
HIGHLY RECOMMENDED: Some additional things to perform post install- Check your nozzle size setting in HW Setup menu if changed. Run the following Calibrations: Self Test, Full XYZ calibration, Temp Calibration, First Layer Calibration.
-
-
-
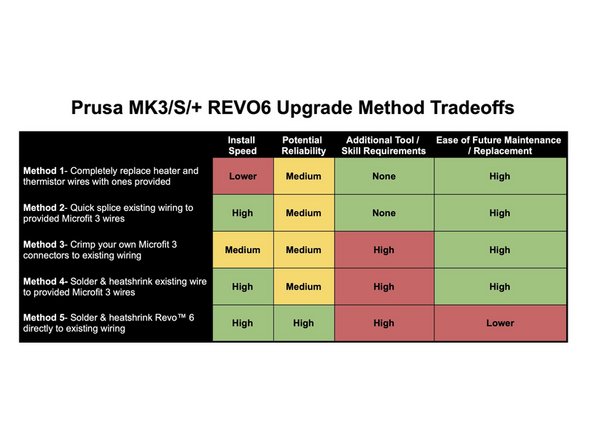
With each method of installation you are trading off between four main criteria: speed of installation, reliability, skills and tools required, and ease of future maintenance / replacement.
-
Every splice / connection point is a potential wear point or point of failure. The more of these you have in the path between your hotend and your board the higher the chance for error / failure at some point.
-
Keep in mind the 3D printer's wire bundle is in constant motion during printing and over time weakness in the connections can be exposed from this mechanical action. We have taken the time to analyze these potential stress points and positioned our splice points where we believe they will hold up best over time.
-
There is no right or wrong answer to which method is best here. Ultimately you will need to decide what tradeoffs are right for you. Keep in mind that worst case you can always rewire with another method in the future if you decide your current method isn't working.
-
-
-
Select the method from the following chart that best matches your preferences for speed, reliability, skills/tools, and future maintenance.
-
METHOD 1: Using the standard E3D install guide and completely replace heater and thermistor wires with ones provided.
-
METHOD 2: Splice existing wiring to provided Microfit 3 wires with the included tool-free Quick Splice connectors.
-
METHOD 3: Crimp your own Micro-fit 3.0 connectors to existing wiring. This is out of the scope of our current kit but is certainly an option if you have the required tools and skills to do this.
-
METHOD 4: Solder & heatshrink existing wire to provided Micro-fit 3.0 wires. This is out of the scope of our current kit but is certainly an option if you have the required tools and skills to do this.
-
METHOD 5- Solder & heatshrink Revo™ 6 directly to existing wiring. This is out of the scope of our current kit but is certainly an option if you have the required tools and skills to do this.
-
-
-
Now that you've read the options and understand the benefits and drawbacks go ahead and chose the guide that's best for you.
-
-
-
There are two main failure modes that will make themselves quite obvious if your REVO installation goes sideways:
-
Inconsistent thermistor readings / rapid fluctuations / MAXTEMP errors- This is almost always a sign of a bad connection between either your thermistor or heater connection and the control board. Check your splices / crimps / seating of your microfit connectors when this happens.
-
No thermistor reading or no heat when turning on the hot-end- Either your wires for your heater and thermistor are crossed or you have an open contact somewhere. Check that you've wired correctly and that everything is indeed plugged in.
-
If you've tried all of these things and are still having problems it is possible that there may be an issue with your REVO unit. If you feel like that may be the case please reach out to E3D Online Support here
-
Cancel: I did not complete this guide.
One other person completed this guide.
